Friday, May 25, 2012

Chocolate with Strawberry Filling - Pattern for Crochet Slippers

    If you need a pair, buy them here. 


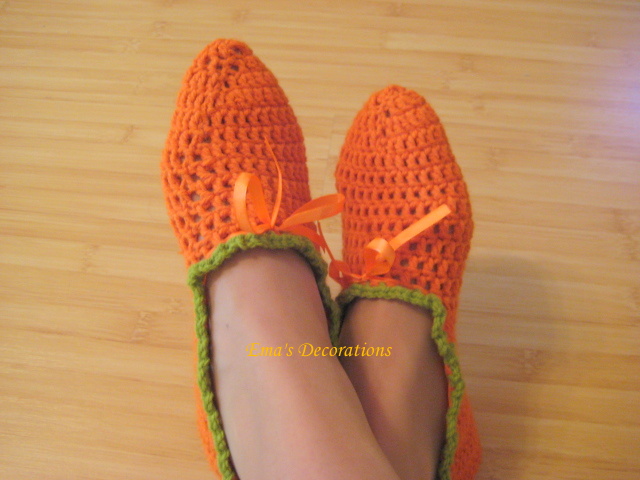
Yummy chocolate with strawberry filling. But now ... it's about my crochet slippers. I made them with brown yarn, a pink edge and I attached a pink bow.


 Need a pair? Grab a hook and learn to make them. I design this pattern. You can use it - it's just a pattern and it was a pleasure for me to make these slippers, but please share my page.

r1 - chain 5, sl st and make a ring
r2 - 8 sc into the ring
r3 - 2sc in each stitch - you have 16 stitches
r4 - 1 sc, 2 sc in the next, repeat till the end  - now you have 24 stitches
r5 - 1 sc, 2 sc in the next, repeat till the end
r6 - 1 db crochet in each stitch


r7 - r 15 - 1 db in each stitch, ch 1 and turn your work


Measure on your foot to see if you have to start to make only the sole.


r16 - db in 26 stitches (in the middle you have 8 stitches), ch 1, turn
r17 - db in the first st, 2 db in the second, db in the next, 2 db in the 25th st, db in the last, ch 1, turn - this row is for increasing your edges
r18 - db in each stitch, ch 1, turn
-alternate rows with increasing ( as r17) with rows without increasing (as r 18), until you finish
-I made in this way 13 rows; fasten off; sew or crochet together the edges for the heel.


For the pink edges - attach the pink yarn in the back, at the heel, and make a ch 1. Make sc in each space you found along the edges.


Attach a pink bow in front.


This is a project for beginners. You can make these slippers in 2-3 hours.


They can be a great gift for a lady.


If you have any questions, please leave a message.

Ema 

Wednesday, May 9, 2012

Optimistic Crochet Slippers

    You can buy them here. Leave a comment with your size. 


I love shoes, especially comfortable shoes. I like slippers too. I like to be funny or colorful. For this reason I crochet these orange slippers. They are so optimistic! I like to wear them all day long and they cheer me up. 


If you want to say that they look like some carrots ... I'm agree. Maybe I'm carrots fairy ! 


Orange and green are great together. And the orange shiny ribbon gives a delicate touch and help me to fix them on my feet. 


I'm searching for more delicious and optimistic colors combination.


If you want a pair too for yourself or for somebody else, you can buy them. Just click on the button on the top of the page and leave a comment with your size (or your colors combination)


Delicious Strawberry Slippers - crochet slippers pattern

   If you need a pair of Delicious Strawberry Slippers for you or for your daughter, you can buy here. But if you want to crochet them, here is the pattern.


My 6 years daughter loves strawberries. I love them too. I love their taste, their perfume, the shape and the color, their white and delicate flowers. I made for myself a pair of orange slippers and my daughter wanted to make some  for her, but to be strawberries. I think I have to make a pair for myself too. They are optimistic and colorful and they are perfect in the morning to cheer me up and to warm my feet while I make a good coffee. 


It's easy to crochet them and you need only 2 hours to make them. 

You need: green, white, yellow and red yarn, little yellow beads, a needle, red thread, and a hook of course. I used a thick red yarn and I crocheted only with double crochet stitches. 


R1: chain 5 and slip stitch into a circle
R2: chain 2 and 7 double crochet stitches into the ring
R3 - R4: chain 2; 1 double crochet into the first stitch, 2 double crochet into the next until the end of row; slip stitch
R5 - R12 - 1 double crochet in each stitch (measure it on the feet to see if you have to continue 1 or 2 more rows in this way, because it depends on every size)
R13 - turn the slipper; chain 2; 1 double crochet in the next 15 stitches (now you begin the sole)
R14 - R20 - turn it; chain 2; 1 double crochet into the first stitch, 1 double crochet in every stitch, 2 double crochet in the penultimate stitch, 1 double crochet in the last (if you need more, you can crochet more rows, until you get to the heel.
Join the heel edges together with slip stitch. The slipper is done.
To crochet the green edge - slips stitch with green yarn in the back, chain 1 and single crochet in every space.


I sewed some little yellow beads in the front of the slippers with red thread.
For the flower I used a pattern from my blog: Crochet Flower Pattern, but I used yellow in the middle and white for the petals. Then I sewed it on the slipper.


If you have any question, please leave a comment.


Enjoy it.


Next project: Strawberry bag or backpack.


Friday, May 4, 2012

Sew and Crochet Skirt - a tutorial

My 6 years daughter is growing rapidly and all her clothes become smaller everyday. I researched on the Internet and I found that I can transform a dress or a tee-shirt into a new dress, skirt or a blouse. And this is one of a kind project: to transform a dress into a skirt.


 Follow me and my pictures to find out how. I decided to cut the front part of the dress and to make a crochet waistband.


I crocheted the waistband. This is the pattern: 
-115 stitches
-R1 - half double crochet in each stitch
-R2 and R 3 - chain 2, front post half double crochet, back post half double crochet 
-R 4 and R 5 - chain 1, front loop crochet only - in this way I made a line that can bend to hide the edge of the skirt and help me to sew it. 


I fixed the edge of the skirt with pins between the crocheted waistband.


Then I sewed the edges on the back and ...


... on the front.

I cut the cord of the dress and I sewed together the edges. 


With a safety pin I insert the cord through the waistband. 


This is the skirt. It's ready.


This is the back of the skirt.


If you have any questions, leave a message.
If you like my project, share it. :) Maybe another mom needs to make something like this.


This is the entire tutorial. Enjoy it. :) 


Wednesday, May 2, 2012

Blueberry Bear - crochet pattern for a bear

My daughter loves bears. She has 10 or 14 teddy bears in her room: white, brown, pink, blue. Every bear has a name, of course: Blueberry, Chocolate Bear, Pink Bear, Martin, Snowflake.... Her favorite is Martin, because she has is from she was a little baby.
Now I made a crochet bear. She called it Blueberry (another one!), because it's blue. I admit: I researched many patterns to learn how to make one, but for the moment I could find one to be perfect for me: not too big, not too small, not so difficult to make it. I began to learn how to crochet a bear by pieces: first a ball for the head, then the body like a pear, then the arms and legs. I'm not satisfied with the muzzle, but I'm learning.


I used single crochet (sc), back loop work, increase (inc) and decrease (dec).


The head
R 1: chain 6 and slip stitch in a circle
R2: inc
R 3: 1 sc, inc
R 4: inc, 2 sc
R 5: 3 sc, inc
R 6: inc, 4 sc
R 7: 5sc, inc
R 8: inc, 6 sc
R 9, 10, 11, 12, 13, 14 sc around
R 15: dec, 6 sc
R 16: 5 sc, dec
R 17: dec, 4 sc
R 18: 3 sc, dec
R 19: dec, 2 sc
Stuff and finish leaving a long tail to sew the bod and the head. This is the head - it's like a ball:


The body – it looks like a pear
R 1:
chain 6 and slip stitch in a circle
R 2: inc
R 3: 1 sc, inc
R 4: 2 sc, inc
R 5: inc, 3 sc
R 6: 4 sc, inc
R 7: sc, inc
R 8: sc, inc
R 9, 10, 11, 12, 13, 14, 15 sc around
R 16: 6 sc, dec
R 17: sc around
R 18: dec, 5 sc
R 19: sc around
R 20:  4 sc, dec
R 21: 3 sc, dec
R 22: dec, 2 sc
Stuff and finish leaving a long tail to sew the bod and the head. The body looks like a pear. 


The legs – you have to make 2
R 1:
chain 6 and slip stitch in a circle
R 2: inc
R 3: 1 sc, inc
R 4: 2 sc, inc
R 5: back loop working sc around
R 6 and 7: sc around
R 8: 2 sc, dec
R 9: sc
R 10: 2 sc, decrease
R 11, 12, 13: sc
Stuff and finish leaving a long tail to sew the legs.


The arms – you have to make 2
R 1:
chain 6 and slip stitch in a circle
R 2: inc
R 3: 1 sc, inc
R 4: back loop working sc around
R 5 - 10: sc around
R 11: dec
Stuff and finish leaving a long tail to sew the arms 


The muzzle:
R 1: chain 6 and slip stitch in a circle
R 2: inc
R 3: 1 sc, increase
R 4: back loop working sc around
R 5: sc
R 6: 1 sc, dec
Finish and leave a long tail to sew the muzzle. 


The ears – you have to make 2
R 1:
chain 6 and slip stitch in a circle
R 2: inc
R 3: 1 sc, inc
R 4: back loop working – 2sc, inc
R 5 – inc, 3 sc
Finish and leave a long tail to sew the ears.


After I finished to crochet the pieces, I sewed the eyes and the nose from black felt. The eyes are round and the nose is a triangle.


This is my bear. Or my daughter's Blueberry Bear. Sometimes I think it is ... like a mouse. Ha ha ha :). I don't know what it looks it to seem more like a mouse not like a bear, but ... I have to practice more.


A big one and a small one.


Penguin Toy

A new penguin toy in my collection. Soft and fluffy, I made him from two different fleece. My daughter said that fleece from his belly is a...