Monday, December 17, 2018

Black and White Quiet Book, Monochrome Book

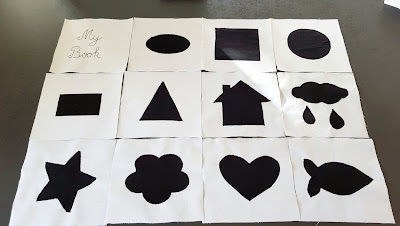
This black and white book is for visual stimulation. I saw that for kids room some parents prefer not so many colors, not a mix a bright colors that can distract the kids attention. I am agree with this.

black and white


You can see the entire book in this video. 


As my other quiet books, this one has multiple uses. Each page has some ribbons for hanging. So, you can use them for a baby crib and you can change them all the time. 

black and white

Each page has a shape. There are basic shapes, such as a rectangle, a circle, a triangle, a square. Others are creative shapes: a heart, a star, a fish, a house.

black and white

This is the back of the pages. All the black shapes are sew by sewing machine. Here I attached the ribbon for hanging. 

black and white

I sew around the pages, 2 sides, leaving a small open for turn them. 

black and white

I turned the pages inside out and I sew the open. 

black and white


black and white

The book can be used as a book too. You can teach shapes. The kids can follow with their finger each shape.

black and white

The book is made of black and white cotton. It can be washed and iron.

black and white


black and white

Make a monochrome book too. It is easy. You can use white and red or white and blue too. 

I sold this book, but if you want one, please contact me or visit My Shop

Ema 


Monday, December 3, 2018

How I made a custom toy - a bird toy

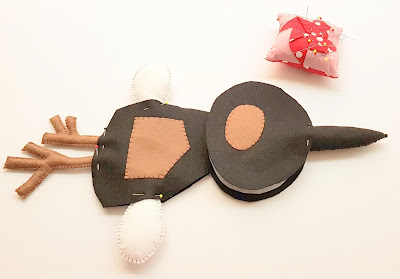
Maybe my explanation will help you to make a sew a custom toy after a kid's drawing. This is a bird from a picture that I received.

custom toy

Materials I used: felt (black, white, brown), adhesive fabric, anti bacterial poly filling, brown thread

custom toy

I enlarged the design and I trace a pattern. I used to make the pattern a little bigger because I sew the edges. Then I cut the pieces: the head, the body, the beak, the wings and feet and other details. Some of the parts are going inside others, so I have to consider them longer. For example, the feet and the wings will go inside the body. The body will go inside the head. The beak will go inside the head. So, these pieces are longer. 

custom toy

Sometimes, for stability, I put adhesive fabric on some pieces. For this bird, I put it on the head, beak, body, wings, feet. The adhesive fabric has one side with a special adhesive. You put the fabric on your piece of felt in this case, and press it with a hot iron. Be careful, the glued part must be on your felt, so they can collate each other. 

custom toy

I sew the small parts: the wings, the feet, the beak. they will go inside the other parts, so I need them first to be done. Then I sew the details, in this case the eye and the brown shape on the body. 

custom toy

Then I pin the parts together following the drawing: the wings, for example, must be in the wright place. Here, first, I sew the body, around, using blanket stitch. Before closing it, when the open is large enough, I fill the body with anti bacterial poly filling. Not too much, it has to be soft. 

custom toy


custom toy

Then I sew the head and then I attach the body that will go inside the head. Finish off. 

The bird is done. This one was a quick project. Other toys are with lots of details and many colors. 

If you have any questions, please leave a comment, I will help you. 

Happy sewing! 
Ema 

Sunday, December 2, 2018

Handmade dragon toy, a custom toy after a kid's drawing

Every toy I make is a challenge. Some of my toys are made after my pattern. But others are made after kid's drawings. This handmade dragon toy is one of them. I received a picture with some dragons. I have to make a particular position with other one dragon wings.

handmade dragon toy

The challenge was not only to find the best size, the best wing, the best position of the wings on the body, but to make this thin body strong enough to carry the wings. And to make the wings to look light but puffy, big enough too.

handmade dragon toy

Then, I search in some fabric stores the perfect color and the perfect felt. But I did it. Completely sew by hand, filled with anti bacterial poly filling. This is the dragon, a blue one, made after a kid's drawing. I think it will be a Christmas present for a boy. 
If you want a custom toy made just for you, visit my Etsy Shop Here

Have fun! 
Ema

Friday, November 30, 2018

Butterfly quiet book

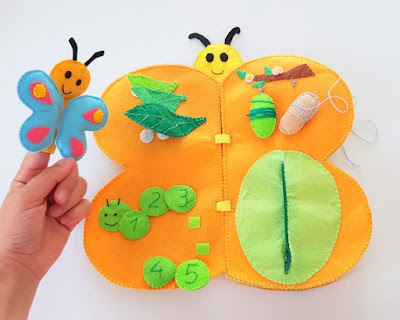
I like to make things with multiple uses. My quiet books are educational toys. Because I am a teacher, I try to make everything to follow a teaching purpose. This is a butterfly shaped quiet book. It can be used at home or at school for many activities. 

quiet book

Activities with my butterfly quiet book 

  1. Count from 1 to 10, move up and down the beads. It is important for kids to move the objects. 
  2. Talk about butterfly life cycle. Under the leaves, you will find out the eggs. 
  3. Talk about inside and outside, hiding the butterfly inside its cocoon. The butterfly is a finger puppet. 
  4. Invent some stories about the butterfly. 
  5. Count the eggs, the leaves, the caterpillar circles. 
  6. Move the caterpillar circles while counting them. 
quiet book
Butterfly quiet book 

7. Weave the cocoons. 

quiet book


quiet book

8. This is the front cover. It has sequin fabric on the wings and you can feel it with your fingers.

quiet book

9. Match the colors and the wings. Sort them, count them.

quiet book

10. This is the back cover of the book. Move up and down the butterflies. Invent a story. 

quiet book

You can find my book in My Shop. Or you can order one with your design. 

quiet book
Butterfly quiet book
If you want a book like this, visit my Etsy Shop. 

EmaDecorations


Friday, November 23, 2018

Pig Toy, Pigglet Soft Toy

Pigs toys. I made them because they are cute, and the fabric inspired me to make them. In a bunch like this, they make me smile every time I see them.


So, I made 2 kinds of pigs. First with fleece, pink fleece. I sew a red fleece heart on their belly. Lovely pigs I think. Perfect for Valentine's Day too. 


And I made other 2 with fabric: pink and light grey fabric and roses fabric. Romantic pigs. They also have a heart pocket on the belly. You can put a note in there. And they have some cute tails too. 


Pigs for New Year, pigs as toys or as decoration for your couch, or pigs for Valentine's Day, they are cute. Make you smile. 

If you want one, please visit My Store

Ema 


Sunday, November 11, 2018

Fabric Christmas Tree Ornament - How to make it

How to make a simply Christmas tree ornament from fabric. This is an easy tutorial and the pattern is versatile. You can adjust it at the size you want. If you use Christmas theme fabric, with red, green and white colors or with Christmas pattern, with stars, tree, elves, or presents or something else, your ornaments will be perfect for your Christmas tree or Christmas decorations.


Materials: fabric, brown felt for the trunk, ribbon for hanging (I used green thread and I crocheted a chain), poly filling, sewing machine, thread and needle, scissors. 

For the ribbon for hanging I crocheted a 30 cm chain from green thread because the ribbon that I had was too thick. 


Draw a pattern, a triangle, an isosceles triangle with the two sides of equal length of 17 cm and the base of 13 cm. But, like I said, the pattern is versatile, you can make a bigger or a smaller pattern. Cut the fabric - 2 parts for every tree. Cut a small rectangle for the trunk from the brown felt ( 2,5 x 5 cm°). 


Place the fabric face by face. Place the ribbon on the top. The ribbon must go inside, and the end has to remain outside. Same for the trunk: place the trunk on the bottom, in the middle, but a small part will remain outside the fabric. 


Sew along the triangle. Start at the bottom, at the trunk, go around. Be careful on the top. When you are again at the bottom, sew the corner, but leave a small opening. Trim just a bit the corners. Turn your tree, stuff with poly filling. Sew the bottom. 


Fill in and sew the bottom with an invisible stitch. 


If you want to make the tree from scraps, from small pieces of fabric, first sew the pieces all together. 


Then place your pattern, pin it to the fabric and cut the shape.


Then follow the steps above for making a new tree.


Happy sewing! 

Ema


Friday, November 9, 2018

A shy guy, a platypus or just a custom toy from drawing

Look at this shy guy! Isn't it lovely? I don't know what animal is. I made this toy after a kid's drawing. Sometimes I think it seems like a platypus, but I am not sure. :)


It is hard to catch exactly the feeling, the smile, the attitude from a picture. But I did it and I like it how it turned out.


It can be a great gift for a child. I think it will be a nice surprise for him or for her to see the toy. 


Ema 

Penguin Toy

A new penguin toy in my collection. Soft and fluffy, I made him from two different fleece. My daughter said that fleece from his belly is a...