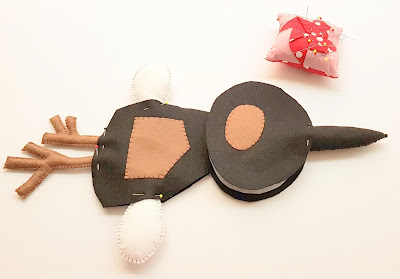
Maybe my explanation will help you to make a sew a custom toy after a kid's drawing. This is a bird from a picture that I received.
Materials I used: felt (black, white, brown), adhesive fabric, anti bacterial poly filling, brown thread
I enlarged the design and I trace a pattern. I used to make the pattern a little bigger because I sew the edges. Then I cut the pieces: the head, the body, the beak, the wings and feet and other details. Some of the parts are going inside others, so I have to consider them longer. For example, the feet and the wings will go inside the body. The body will go inside the head. The beak will go inside the head. So, these pieces are longer.
Sometimes, for stability, I put adhesive fabric on some pieces. For this bird, I put it on the head, beak, body, wings, feet. The adhesive fabric has one side with a special adhesive. You put the fabric on your piece of felt in this case, and press it with a hot iron. Be careful, the glued part must be on your felt, so they can collate each other.
I sew the small parts: the wings, the feet, the beak. they will go inside the other parts, so I need them first to be done. Then I sew the details, in this case the eye and the brown shape on the body.
Then I pin the parts together following the drawing: the wings, for example, must be in the wright place. Here, first, I sew the body, around, using blanket stitch. Before closing it, when the open is large enough, I fill the body with anti bacterial poly filling. Not too much, it has to be soft.
Then I sew the head and then I attach the body that will go inside the head. Finish off.
The bird is done. This one was a quick project. Other toys are with lots of details and many colors.
If you have any questions, please leave a comment, I will help you.
Happy sewing!
Ema


.JPG)

That is so cute!
ReplyDeleteSuch a great tutorial! Thank you for sharing it! and the little birdie is so cute :)
ReplyDeletethank you for the tutorial, makes a great gift for kids :)
ReplyDelete