Sunday, January 29, 2017

Activity felt board - a huge board for kindergarten

This was a challenge. A kindergarten asked me to make a huge board to hang on the wall. I made a huge one 2 x 1,9 meters.


It was a pleasure for me to make it and a challenge too. It is not so difficult to sew a huge board. it is difficult to find the perfect activities to put on it. 


I sewed by hand every tiny piece. 


And some stuffed animals and birds.


A sheep with pom pom for touching and feeling the texture.


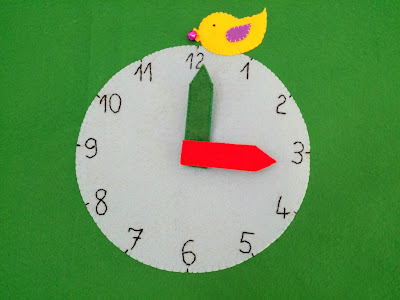
A clock with movable arms.


The tree has birds and snaps. Count from 1 to ten, snap the birds, make pairs by color.


Play tic tac toe with circles.


Weave the horse tail and hair.


Make a pizza and talk about fractions. Place the pizza parts inside the basket.


Count from 1 to 10 and arrange the numbers.


Farm animals. Sing Old McDonald. Hide the duck, the pig and the cow in the bushes.


Apple tree with 10 red apples. Use hook and eyes to hang on them.


Long, long caterpillar with ABC's. Each circle has a letter and Velcro on the back.


Talk about the weather and the seasons. Pull the sun rays, move the rain drops.


How is the weather? Is it warm or cold? Hot or chilly?


Match the colors with the flowers and the buttons, practice how to close the buttons. 


This is my huge activity felt board. Sew by hand, carefully and with attention for details. if you want one, please visit My Etshy Shop - Giant Montessori Wall Board


Best,
Ema


Wednesday, December 28, 2016

Cute personalized toy

Kids can imagine strange and beautiful things. A toy could be something else everyday. I received a new challenge with a picture for a toy that is ... a panda bear with a butterfly head and a cat tail. I have to admit that drawing is so nice and original! It has perfect proportions and the right colors.


I try to make the toy to look exactly like the drawing. I know it is important for kids.


In time, I found out that this kind of toy could have multiple purposes:
- a toy for kids, of course
-but a gift for mom or grandmother too because they always want to keep in their secret drawer something from their kids
-a present for a birthday or a present for no occasion
-a gift for dads
-a memory toy...


If you want a toy made after your kid's drawing, make one. Available in My Etsy Shop .


Best,
Ema

Tuesday, November 8, 2016

Kid's Drawing Turned Into a Plush Toy

Searching for a great gift for your kids? Grab a needle, some colorful felt and a pair of scissors, then ask your little ones to draw their favorite toy or their favorite character. The big surprise is that you can make some cute toys from their drawings.
Materials you need: colorful felt, polyester for filling, a pair of scissors, assorted threads, a needle.


There is no pattern to provide. The drawing is the pattern. Enlarge the picture. Draw the contour of the character. Match the colors. 


Your toy will be the best if you can use the same colors as in your kid's picture and respect the details. For kids, details are very important. Cut the pattern. 


Pin each piece of paper on colorful felt. Don't forget to keep the colors. Cut the pieces. When you cut the pieces, be careful to cut not exactly on the edge of your pattern, but leaving a 3mm edge to helps you to sew the pieces. 


Put the pieces together to see they are perfect. Keep in mind that some pieces will go inside others: the neck inside the head and the body, the hands inside the body, the pants inside the body and so on. 


 Start sewing the details: the face, the eyes, the mouth. Use assorted colors or contrasting ones, according to your picture.


Sew the parts together. You're done. You have a beautiful plush toy made after your children's drawing. And your little one will be very, very happy. 


You can order your personalized toy in My Etsy Shop

Best,
Ema 


Tuesday, November 1, 2016

November Wallpaper Calendar

I made a wallpaper with calendar for this month, November. It is useful to set it as desktop background because you can have a fall design and a November calendar right on your desktop. Download on your computer Here - November Calendar Wallpaper


Happy Fall.
Ema

Friday, October 28, 2016

Cross Stitch Bookmark Tutorial

I made a cross stitch bookmark for a lovely person. She wanted to write Imagine Peace built by Yoko Ono. I show you in this easy tutorial how to make one bookmark for you.


If you know how to write the letters using cross stitches, that's fine. If you don't, use an online cross stitch writing tool. I like StitchPoint.


I sew the words Imagine PEACE and I added two little hearts. Here it is a short movie.


The fringe - Here it is how I made the fringe. I pulled apart the threads from the ends, using a needle. Be careful, they need to be the same size.


I made an edge to sew it.


I cut a piece of white felt for the back.


I sew the bookmark and the felt together, on the edge, using blanket stitch.


And this is the cross stitch bookmark. Make one for a special person in your life. Choose some words with a special meaning, a quotation.


Happy sewing.
Ema

Thursday, October 27, 2016

Mandala crochet bag free pattern

Make a mandala bag for your girl.
This is a free pattern for a mandala crochet bag. You can use what yarn you want and a proper hook.
Yarn - I used Charly yarn from Phildar: ligh and dark pink and grey - 1 skein of each
Hook no 6

Stitches:
single crochet - sg
double crochet - db
slip stitch - ss
chain - ch
You will work in round and you will join every row.


r1 - with pink - chain 3 (count it as the firs dc), make 9 dc into the ring, join with slip stitch (ss) in top of the ch 3 - you have 10dc


r2 - ch 4 (count it as the first dc and ch 1), *make 1dc in the next dc + ch 1* - repeat between ** 9 times, join with ss in the 3rd ch of the beginning 4th ch

r3 - with grey - ch 3, 1 dc into the base of ch 3, ch 2, *2dc in the next dc, ch 2* - repeat between ** 9 times, join with ss in the beginning of ch 3


r4 - ch 3, 1 dc into the base of ch 3, 1 dc into the next dc, ch 2, *2dc in next dc, 1dc in next dc, ch 2* - repeat between ** 9 times, join with ss in the beginning of ch 3


r5 - with dark pink - ch 3, 1 dc in next dc, 2 dc in the next dc, * 2 dc into next 2 dc, 2dc in the next dc** - repeat between ** 9 times, join with ss


r6 - shell stitches - ch 3, 2 dc in the base of ch 3, ch 1, skip 1dc * 3dc in next dc, ch 1, skip 1dc* - repeat between **, join with ss
r7 - with light pink - ch 3, 1 dc in next dc, 2 dc in the next dc, * 2 dc into next 2 dc, 2dc in the next dc** - repeat between ** 9 times, join with ss


r8 - with grey - ch 3, 1 dc in every dc until the end, join with ss. Finish off. 


Make two parts for this bag. 
Tight the long tails on the back of every part, hide the tails using a hook or a needle. 


Here are the 2 parts. Even if I worked with the same hook and in the same day, the second part was smaller. I made another round with light pink with simple crochet in every stitch. Every part is almost 9 inches (22,5 cm) in diameter.


The part between the 2 parts of the bag - you have to sew it at the ends. I made it with grey yarn - ch 7, 1 sg in the 6th stitch from the hook, sg in every st, ch 1 and turn. It has almost 22 inches (56 cm).

Pin the grey part between the 2 mandala parts and crochet them together on the edges using single crochet. 


The handle - I used pink and light pink for the handle. I made it in the same way as the grey part - ch 7, 1 sg in the 6th stitch from the hook, sg in every st, ch 1 and turn.It has 40 inches (100 cm). I made a strip from fabric with sewing machine and I sew it on the handle. In this way the handle will not stretch out. 


I sew the handle at the end of grey middle part. 


Because the mandala crochet bag has some holes, I sew fabric inside. 


Happy crochet.
Ema 


Penguin Toy

A new penguin toy in my collection. Soft and fluffy, I made him from two different fleece. My daughter said that fleece from his belly is a...